Quantum model in radiology is what happens to an image when not enough X-ray photons make it to the imaging receptor. It creates a grainy image and is primarily the fault of not having a high enough mAs. When increasing mAs to help fix the quantum model, the radiologist must increase their exposure factors. This increase in mAs should be at least 30% in order to see a noticeable difference and is most commonly increased by a factor of two. This increase in mAs will help to patch the holes that are on the image receptor. An easy way to tell if an image has quantum model is to check the different gray areas to see if there are specks or dots. This would indicate that more mAs would be needed in order to penetrate the patient’s body.
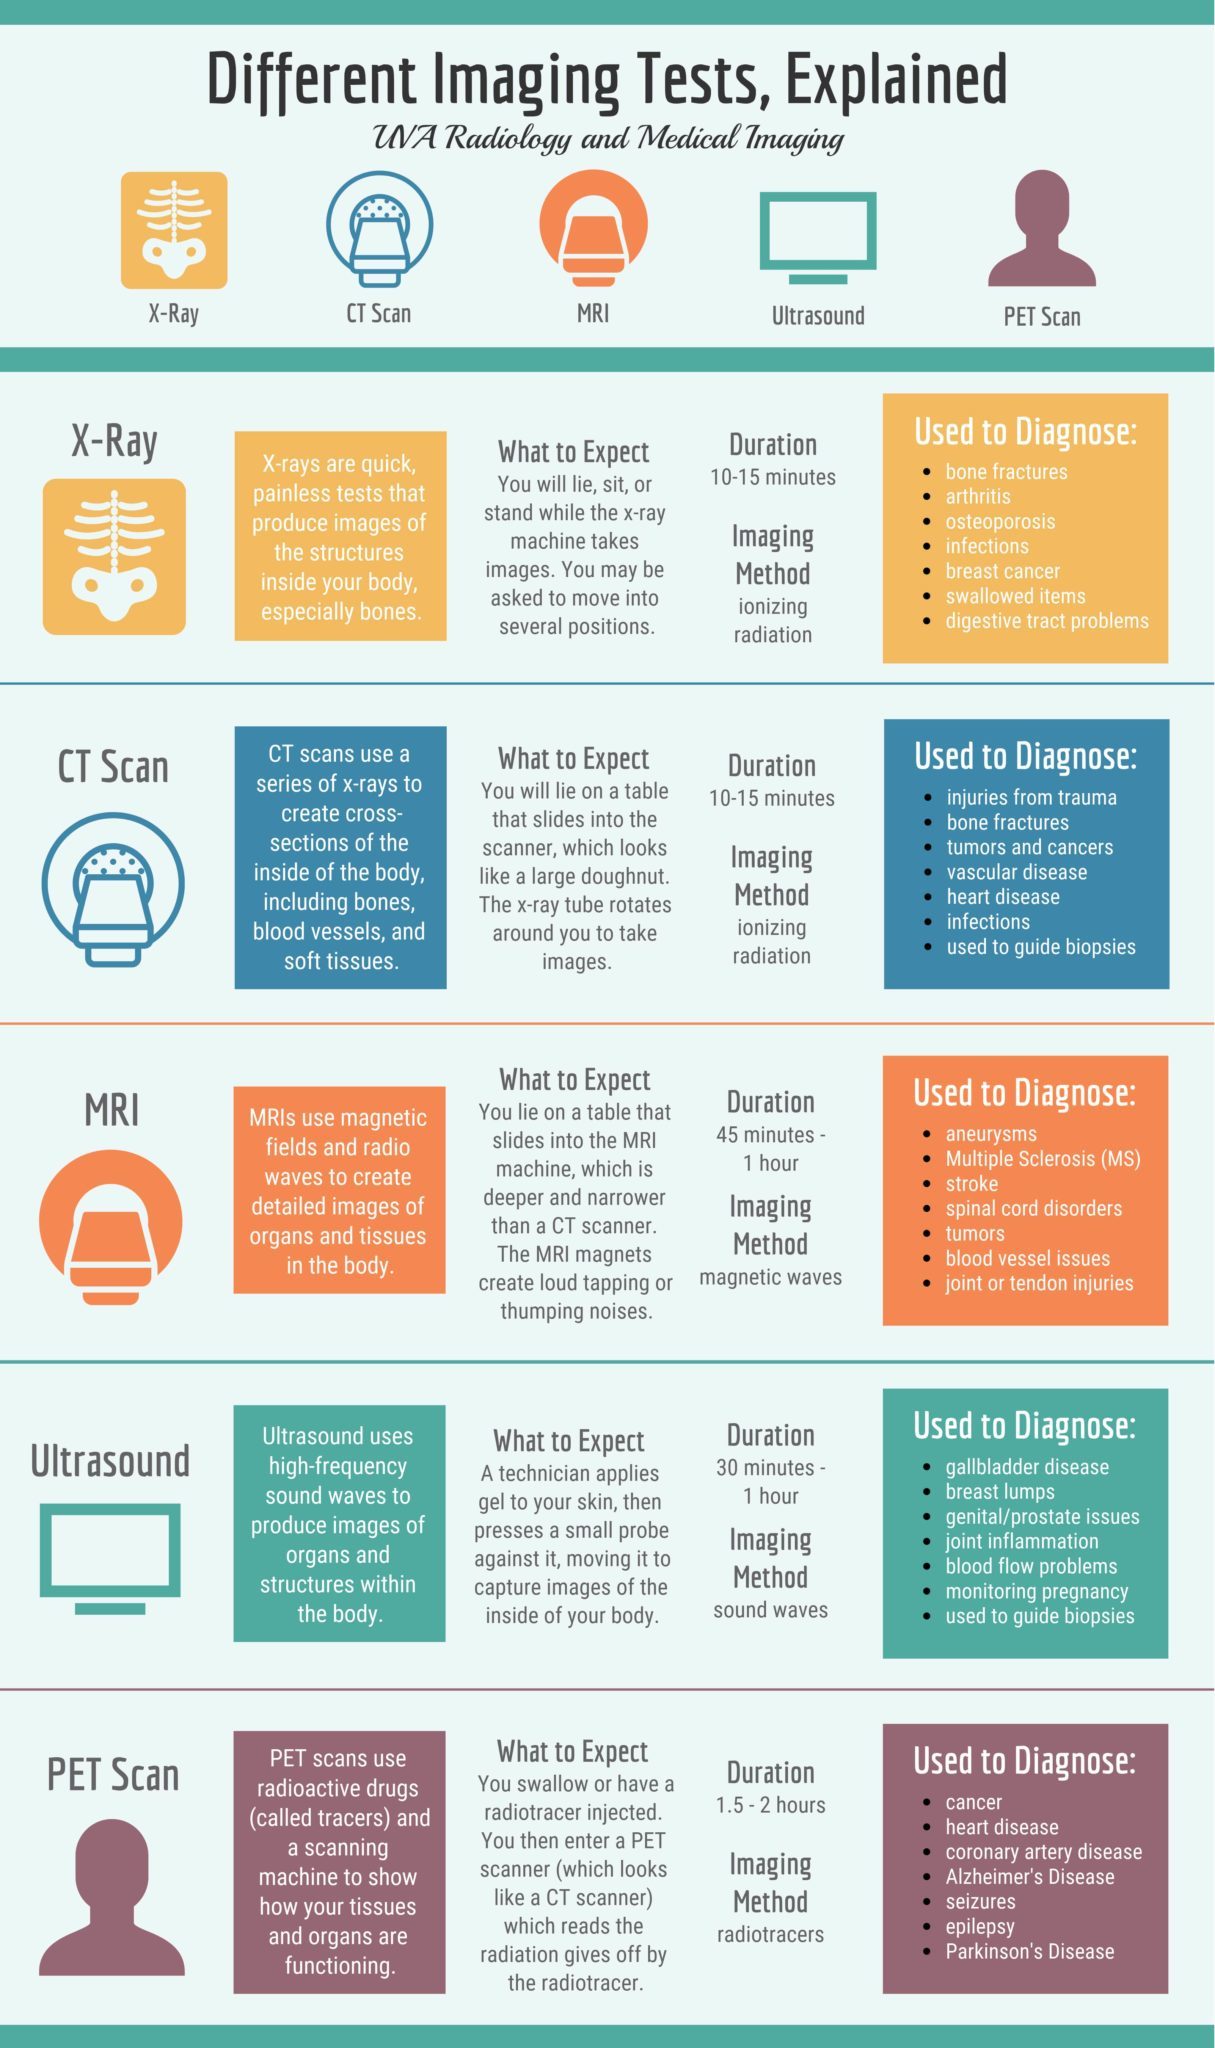
Go figure. . . X-ray is not the only modality in radiology, but it is the best! There are other modalities other than X-ray and some of the most common ones include computer tomography, magnetic resonance imaging, ultrasound, and PET scans. Each are unique and play a crucial role in diagnostic imaging. CT can create series of cross sections that can look at the insides of the body. MRI uses radio waves to create detailed images in order to diagnose tumors and other issues with tissues in the body. Ultrasound uses sound waves to produce images of different structures within the body. Ultrasound and MRI are both modalities that do not use radiation in their imaging studies. PET scans are able to use radioactive drugs to scan the body for tissue and cells that are irregular such as cancer. Each modality bring a different nuance to radiology and are used to further diagnose patients with different conditions.
At my clinical site, Jefferson uses the Philips brand for their X-ray tube. On it at the top left corner, there is a horse shoe that will light up whenever it is ready to take the exposure. Now what happens when your machine starts acting up? The first place that I go to is that green horse shoe to check to ensure that it is lit. By checking this, I can confirm that the X-ray tube is in its correct positioning and ready to fire. That green horse shoe could not be green for a number of reasons. Most commonly, either the tube is not locked transversely, the tube is not aligned to the IR, or the wrong position of the IR could be selected. These are the three things to check when your machine refuses to fire. Next, if the X-ray tube is not the problem, I will check the IR to inspect that the battery has a charge. This is important because if it does not have a charge, then the IR will not create an image. The simplest way to check this is to press on the power button and see how much battery is in the IR. The last thing that you can check is the control panel. On the control panel, you can see information that might lead you to not being able to take an exposure. For example, a position could not be selected or exposure factors could not be set.
It is important that a radiology technologist takes steps before starting the exam to prep the patient. Prepping the patient is a step that will ensure the success of the procedures and enable the procedures to continue without having to halt or stop. This will decrease time spent on a procedure and increase efficiency. Prepping the patient can be done by following a few simple steps.
1.) You can ensure that the patient is properly changed for the examination. This means taking any and all material off the body part that you will be imaging. This will ensure that there is less time spent on redoing an image because of an artifact in the image. These artifacts range from bra straps, bracelets, necklaces, and other metal items on the person.
2.) The next thing that you could do to prep the patient is to go over the different positions with the patient. If the patient has an idea of what the position looks like before having to get into the position, it can save time and confusion. This step is like writing an outline; yes, it increases the amount of work, but you are able to move quickly through the different positions.
3.) The last thing that you can do to prep the patient is something that you can do while working. This step is constantly talking to the patient. While it might not seem like it does anything to the radiology technologist, it will get the patient’s mind off of the pain and have them focus on the task at hand. By having them listen to your vocal cues, you are able to enable your positions to be more efficient.
Patient positioning is one of the most important things that separates a good technologist from a bad technologist. It is inevitable that a radiology technologist will get a patient that is unable to preform the different positions perfectly; however, it is our duty to ensure that the best positions possible are taken. This is important because different positions will make certain structures look different. For example, when taking an image of the hand, if the patient is unable to fully extend their fingers, then the joint spaces between the phalanx will not be open. These joint spaces are what the radiologist uses to determine if something is dislodged or broken. Another example with the hand is if you are not aligning the patient’s hand in the correct position, then you can make an image look like the patient has nothing wrong with their hand when in fact, it is just hidden because of poor positioning. This is one of the most dangerous things in radiology because a poor positioning could hide something that could be crucial to the radiologist’s diagnosis.
One of the first things that affects an image exposure is attenuation. Attenuation is the concept of X-ray beams being absorbed completely and not making it to the image receptor. Attenuation can cause an image to not get the proper exposure that it needs in order to get a proper image display. One way to counteract attenuation could be to increase the levels of kVp so that the tissue or bone is not able to absorb all of the X-ray photons.
Another thing that can affect an image exposure is the thickness of the patient. This is a factor that radiology technologists do not have the ability to control and because of that, we need to be able to increase and decrease exposure factors when necessary. We are able to use calipers to measure out how thick a patient is and be able to increase the kVp in order to properly get an image that is usable. Things like body habitus come into play when having to account for the thickness of a patient and where their anatomy might be. For example, someone who is hyperstenic will have a larger build then someone who is astenic.
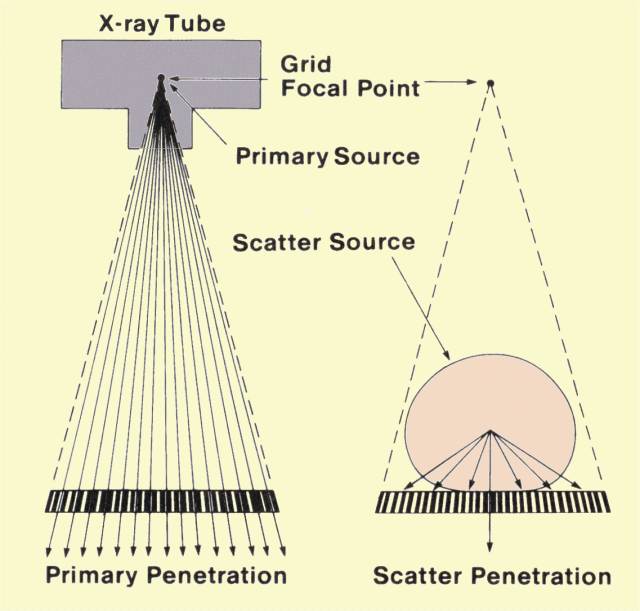
Another thing that can effect an image exposure is scatter. Scatter is what happens when an X-ray photon is redirected by something in the body causing an undesirable image alteration. Scatter can be curved by using things like the grid, which helps diminish the amount of scattered radiation through the means of ensuring that the X-ray beams that are going to touch the IR are perpendicular and come directly from the central ray without interruption.
Size and shape distortion can be created through a variety of different techniques. If you as a radiology technologist are not careful, you can create a visual of something that might not be true about a patient. For example, if you are not careful, an improper SID can create size distortion. This can be seen in chest X-rays when a technologist uses 40 inch SID instead of 72: they can create the illusion of cardiomegaly, which is fancy talk for enlarged heart. If a patient is diagnosed with a condition because of improper imaging procedures, it can cause harm to the patient. Another factor that can increase magnification is things like OID. Object to Image Distance is something that can increase the size of an image and make the part appear larger than it actually is. The more distance between the IR and the patient, the larger the magnification will be.
When looking at shape distortion, something as simple as improper alignment of the X-ray tube can cause an image to appear one way or another. Shapes can either be foreshortened or elongated, and when aligning the patient and the CR, it is important to keep the anatomy in mind. As radiology technologists, we are taught the proper alignment for different procedures. In this, we are taught how to align the Central Ray to the part to the IR. This is crucial because there are some alignments that enable the radiologist to be able to see joint spaces and other important landmarks. Below shows what a different CR can make a standard coin look like when it is exposed.
Spatial resolution is the measurement of the smallest object that can be resolved by the sensor. It is also the level of resolution within an image. There are several aspects that can affect the level of spatial resolution of an image.
The first one is the focal spot size, because when you increase the focal spot size you are going to decrease the spatial resolution. This is because when you increase the focal spot size it will influence the amount of space that would not receive radiation if a smaller focal spot size was chosen.
The next thing that will affect the spatial resolution is the increase or decrease in the source to image distance. This effect is because of the inverse square law which states that an increase in distance will decrease intensity, demonstrating that an increase in SID will increase spatial resolution. The same goes for a decrease in SID which will decrease spatial resolution.
Object to image distance is also something that will affect spatial resolution. Increasing OID will decrease spatial resolution and this is because the image will not have crisp clean edges. One way to fix this is to move the object closer to the image receptor and in turn, this will increase spatial resolution while decreasing magnification.
Finally, the last part that will have an effect on spatial resolution is the patient thickness. This is a factor that the technologist can not avoid and that is because they have no control over how thick a patient’s body is. One way to combat this is to use a caliper and the corresponding X-ray factors.
The differences between short scale and long scale contrasts can be defined by the amount of different levels of gray. Long scale contrasts have more variety in their shades of gray, where as short scale contrast has more white and black and minimal shades of gray. When imaging a patient, the higher kVp you use, the higher the amount of contrast there will be in an image. This level of contrast is what allows the radiologist to be able to determine different structures within the body. The lower the kVp used the less different shades of gray there are within an image. The contrast helps define an image and give relationship between the different densities within the body.
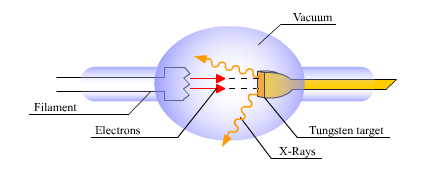
There are three basic factors that you need in order to produce an X-ray. These are done through the actions of the anode, which is the positive side of the X-ray tube and the cathode which is the negative side of the X-ray tube. The first factor that you need is a source of electrons. This is provided by the cathode heating up electrons until they are boiled off.
The next part that you will need is a rapid moving steam of electrons. This is where the electrons are being fired off at a very high speed form the cathode to strike the anode. This stream of electrons is directly proportional to the amount of mA that the control panel is set to and the speed at which they are going is directly proportional to the kVp that is being set on the control panel.
Finally, the last thing that is needed for the production of an X-ray is the electrons to come to a very sudden stop. This causes the electrons to strike the anode and either create a characteristic X-ray photon or a bremsstrahlung photon. The anode acts as the stopping mechanism for the final step of creating an X-ray photon.